一 实验目标
巡线就是让小车沿着规定的轨道(通常是黑线)按照一定的速度进行移动。在本次实验中,需要为小车添加相机,根据图像信息,设计算法使小车能沿着地面的黑线行驶。
计算几个指标:时间、速度、巡线误差。
-
时间:小车巡线一周的时间。
-
速度:速度指代码中电机设置的速度,即motors[i]->setVelocity(X)中的X。包括平均速度和最大速度。
-
巡线误差:简单起见,巡线轨迹图改为一个圆。
二 实验内容与步骤
步骤一:制作新世界
2.1.1 打开新世界
2.1.2 更换背景图片
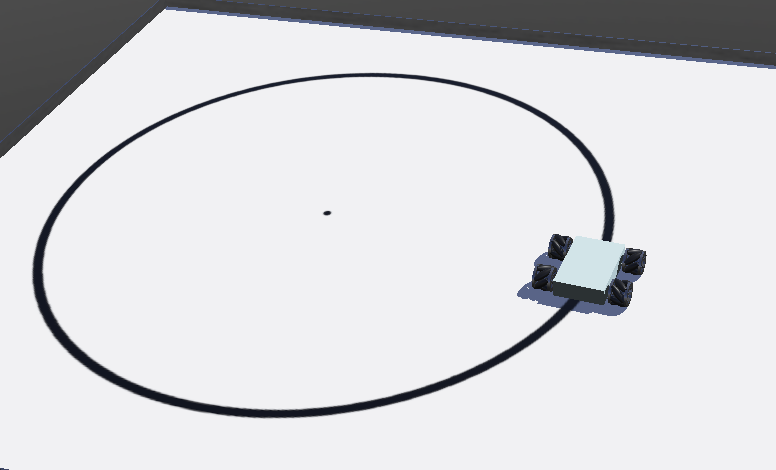
在RectangleArena/floorAppearance PBRAppearance/baseColorMap ImageTexture/url中,将背景图片设为circle.jpg。
2.1.3 修改小车坐标
将小车的translation设为x=0.28104,y=1.26,z=0.0732702。
效果图:
步骤二:添加相机
2.2.1 添加 camera 实体
在Robot/children中新增Base nodes/camera。左上角出现了一个相机,镜头里面是黑色的。
2.2.2 添加 transform 节点
在Robot/chlidren/Camer "camera"/children中新增Base nodes/Transform。
2.2.3 添加shape节点,并设置外观和形状
在Robot/chlidren/Camer "camera"/children/Transform/children中新增Base nodes/Shape。
在Robot/chlidren/Camer "camera"/children/Transform/children/Shape/appearance NULL中新增Base nodes/PBRAppearance。
在Robot/chlidren/Camer "camera"/children/Transform/children/Shape/geometry NULL中新增Base nodes/Cylinder。
2.2.4 设置高度和半径
在Robot/chlidren/Camer "camera"/children/Transform/children/Shape/geometry Cylinder中设置高度和半径height=0.02,radius=0.01。
2.2.5 设置相机的名称和偏移量
在Robot/children/Camera "camera"/childern/name中,设置相机的名称name="camera"。
在Robot/children/Camera "camera"/translation中,设置相机的偏移量x=0.1,y=0.02,z=0.08。
在Robot/children/Camera "camera"/rotation中,设置相机的正前方向x=0.333,y=-0.667,z=-0.667,angle=2。
2.2.6 调整相机的视角
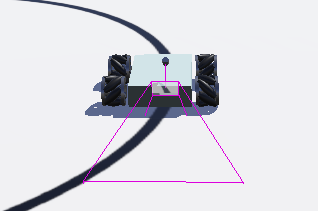
Ctrl+F9显示相机的四条视角线,使相机能够拍到地面的线。
2.2.7 调整相机拍摄的远近
在Robot/children/Camera "camera"/near中,设置相机的偏移量near=0.1,同时设置far=0.5。
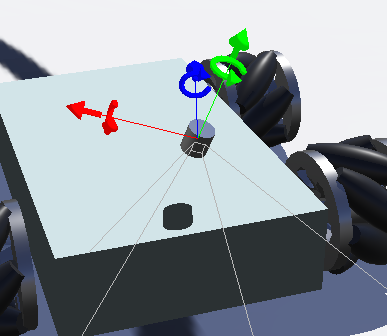
注意:
- 相机的方向的正前方应该是 -z 方向,也就是蓝色箭头的方向。
- 添加camera的过程中不设置boundingObject属性和 physics属性
- 具体参数在调试的时候多次修改,与具体情况为准
效果图:
步骤三:添加camera控制接口代码
添加了控制代码以后,图像的界面框才会显示图像信息。
2.3.1 添加控制器代码
在Robot/children/controller"main"中,添加控制器代码:
#include <webots/Camera.hpp>
#define TIME_STEP 64

	Camera *camera;
	camera = robot->getCamera("camera");
	camera->enable(4 * TIME_STEP);
分别是添加头文件、设置步长和实体化相机对象。
步骤四:设计巡线算法
由于小车的起点在圆周上,因此相机初始时可以观测到贯穿的黑线。要保持小车始终在黑线上运动,最直接的方法就是保证黑线始终在相机拍摄照片的竖直中线的附近。相机可以拍摄到视线中的灰度图,由于地面是白色的而线是黑色的,我认为灰度值大于100的像素点即为黑线。因此,我设计了两种方案可以解决问题:
- 算出所有像数值大于100的像素点的横坐标的平均值。如果该平均值在图像中线以左,就右移;在中线以右,就左移,移动的幅度由距离中线的偏移量决定。由于小车始终需要向前行驶,因此一直给小车一个向前的速度。
- 在图像平面取一条水平的横截线,在横截线上实施方案一。
我采用的方案是后者,我个人觉得两种方案没有本质的区别,而后者的效率更高。在不断地调试参数下,我测量得到在高度的1/3处,小车的稳定性是最高的。
double gray[width];
int left, right;
int left_flag = 0, right_flag = 0;
for (int i = 0; i < width; i++) {
    gray[i] += camera->imageGetGray(camera->getImage(), width, i, height * 1 / 3);
    if (!left_flag && gray[i] < 100) {
        left_flag = 1;
        left = i;
    }
    if (left_flag && !right_flag && gray[i] > 100) {
        right_flag = 1;
        right = i;
    }
}
int mid = (left + right) / 2;
有一种特殊情况,就是可能小车已经偏离太多了,以至于黑线的右半部分已经离开相机了,此时需要设定画面的最右边为right。
if (!right_flag) right = width - 1;
如果小车已经完全偏离黑线了,那么它就应该停下来,切换到手动驾驶模式:
if (!left_flag) {
    cout << "Out" << endl ;
    continue ;
}
当然,这个算法仍有改进的空间。由于小车初始位置在圆上,若一直向前行驶,是会朝外偏离圆周的,所以事实上我们只需要给小车两个速度分量:前进和右转弯。右转弯的速度分量公式如下:
\(speed2[i] = (mid - center_{width}) / velocity * speed_{rightCircle}[i];\)
其中mid表示黑线的横坐标平均值,$center_{width}$表示中线,velocity表示当前的速度。
int mid = (left + right) / 2;
double err = (mid - center_width) / velocity;
for (int i = 0; i < 4; i++)
    speed1[i] = speed_forward[i];
for (int i = 0; i < 4; i++)
    speed2[i] = err * speed_rightCircle[i];
for (int i = 0; i < 4; i++)
    motors[i]->setVelocity(speed1[i] + speed2[i]);
当然还需要注意的是,小车的速度分量的大小也需要动态调整,视具体情况而定。我设置了点击的速度为velocity为10 rad/s,其实可以再大一点,但是要小于20 rad/s。虽然依旧可以正常巡线行驶,但是稳定性会下降。
步骤五:添加GPS
2.5.1 添加GPS实体
在Robot/children中新增Base nodes/GPS。
2.5.2 添加固件
在Robot/children/GPS "gps"/children中新增Base nodes/Solid。
2.5.3 添加shpae节点,设置外观和形状
在Robot/children/GPS "gps"/children/Solid/children中新增Base nodes/Shape。
在Robot/children/GPS "gps"/children/Solid/children/Shape/appearance NULL中新增Base nodes/PBRAppearance。
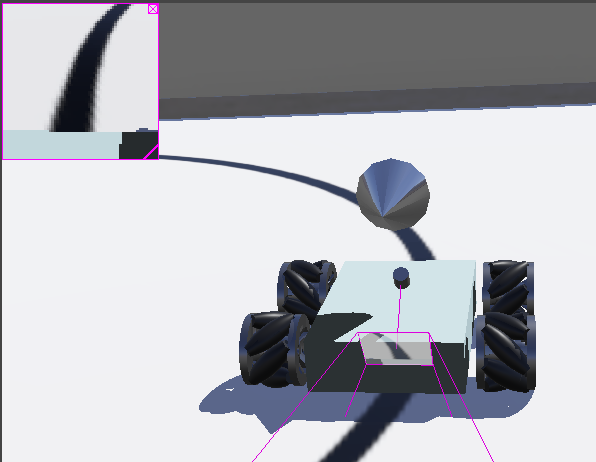
这里为了区别相机我们使用了这个圆锥形的形状作为GPS
在Robot/children/GPS "gps"/children/Solid/children/Shape/geometry NULL中新增Base nodes/Cone。
点击圆锥状的GPS,手动调整大小和位置。
2.5.4 修改gps的名称
在Robot/children/GPS "gps"/children/name中修改名称name="gps"。
2.5.5 添加gps控制代码
在Robot/children/controller"main"中,添加控制器代码:
#include <webots/GPS.hpp>

GPS *gps;
gps = robot->getGPS("gps");
gps->enable(timeStep);
gps->getValues();
分别是添加头文件和实体化GPS对象。
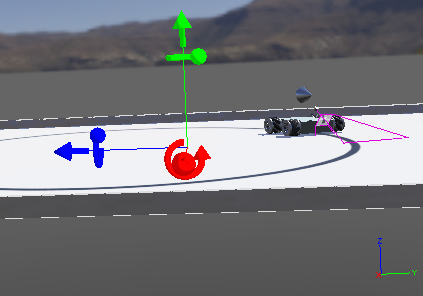
效果图:
步骤六:添加观测指标代码
2.6.1 手动测量数据
首先修改地板的大小,使得圆心落在x=0,y=0处。在DEF ww RectangleArena/floorSize中,将地面大小改成了5x5。
测量圆心位置在x=0,y=0的位置,测量半径为r=1.7m。
2.6.2 制定指标计算方法
- 小车巡线一周的时间:由于已知圆的半径,可以求得圆的周长;通过GPS可以测得小车的速度,由小学数学可以得知,路径/速度=时间。
- 代码中电机设置的速度:这个速度等价于GPS运动的速度。
- 巡线误差:由于已知圆心的位置,可以计算得到当前位置与圆心的距离,与圆的半径做差取绝对值可以得到。
double r = 1.70;
double c = 2.0 * pi * r;

double gps_speed = gps->getSpeed();
double times = c / gps_speed;
if (gps_speed > max_gps_speed) max_gps_speed = gps_speed;
double nx = gps->getValues()[0], ny = gps->getValues()[1];
double error = fabs(sqrt(nx * nx + ny * ny) - r);
if (error > max_error) max_error = error
附件:可执行代码
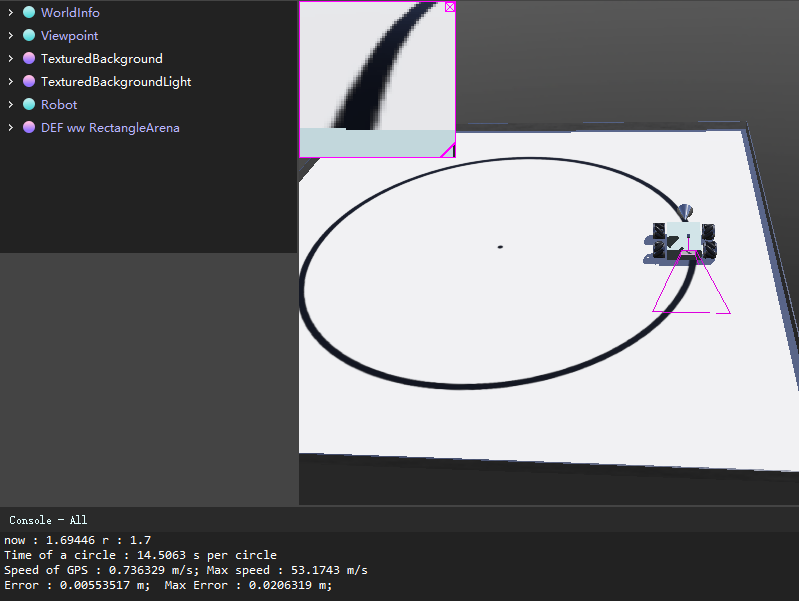
建议运行的时候,将输出终端拉到刚好只能看见四行的输出,这样输出观感比较好。
#include <webots/Robot.hpp>
#include <webots/Motor.hpp>
#include <webots/Keyboard.hpp>
#include <webots/Camera.hpp>
#include <webots/GPS.hpp>
#include <webots/DistanceSensor.hpp>
#include <webots/InertialUnit.hpp>
#include <webots/Gyro.hpp>
#include <webots/Accelerometer.hpp>
#include <webots/Compass.hpp>
#include <webots/Receiver.hpp>

#include <bits/stdc++.h>
#include <limits>

using namespace std;
using namespace webots;

const double pi = acos(-1);

int main() {
    Robot *robot = new Robot();

    webots::Keyboard keyboard;
    keyboard.enable(1);

    int timeStep = (int)robot->getBasicTimeStep();

    Camera *camera;
    camera = robot->getCamera("camera");
    camera->enable(timeStep);

    int width, height, center_width;
    camera->getImage();
    width = camera->getWidth();
    height = camera->getHeight();
    center_width = width / 2;

    Motor *motors[4];
    char wheels_names[4][8] = { "motor1","motor2","motor3","motor4" };

    GPS *gps;
    gps = robot->getGPS("gps");
    gps->enable(timeStep);
    gps->getValues();

    double r = 1.70;
    double c = 2.0 * pi * r;
    double ox = 0, oy = 0;
    double max_gps_speed = 0, max_error = 0;

    double speed1[4];
    double speed2[4];
    double velocity = 10;
    double max_velocity = 14.81;
    for (int i = 0; i < 4; i++) {
        motors[i] = robot->getMotor(wheels_names[i]);
        motors[i]->setPosition(std::numeric_limits<double>::infinity());
        motors[i]->setVelocity(0.0);
        speed1[i] = 0;
        speed2[i] = 0;
    }

    double speed_forward[4] = {velocity, velocity, velocity, velocity};
    double speed_backward[4] = {-velocity, -velocity, -velocity, -velocity};
    double speed_leftward[4] = {velocity, -velocity, velocity, -velocity};
    double speed_rightward[4] = {-velocity, velocity, -velocity, velocity};
    double speed_leftCircle[4] = {velocity, -velocity, -velocity, velocity};
    double speed_rightCircle[4] = {-velocity, velocity, velocity, -velocity};

    printf("init successd ...\n");

    while (robot->step(timeStep) != -1)  {
        int keyValue1 = keyboard.getKey();
        int keyValue2 = keyboard.getKey();

        if (keyValue1 > 0) {
            if (keyValue1 == 'W')
                for (int i = 0; i < 4; i++)
                    speed1[i] = speed_forward[i];
            else if (keyValue1 == 'S')
                for (int i = 0; i < 4; i++)
                    speed1[i] = speed_backward[i];
            else if (keyValue1 == 'A')
                for (int i = 0; i < 4; i++)
                    speed1[i] = speed_leftward[i];
            else if (keyValue1 == 'D')
                for (int i = 0; i < 4; i++)
                    speed1[i] = speed_rightward[i];
            else if (keyValue1 == 'Q')
                for (int i = 0; i < 4; i++)
                    speed1[i] = speed_leftCircle[i];
            else if (keyValue1 == 'E')
                for (int i = 0; i < 4; i++)
                    speed1[i] = speed_rightCircle[i];
            if (keyValue2 == 'W')
                for (int i = 0; i < 4; i++)
                    speed2[i] = speed_forward[i];
            else if (keyValue2 == 'S')
                for (int i = 0; i < 4; i++)
                    speed2[i] = speed_backward[i];
            else if (keyValue2 == 'A')
                for (int i = 0; i < 4; i++)
                    speed2[i] = speed_leftward[i];
            else if (keyValue2 == 'D')
                for (int i = 0; i < 4; i++)
                    speed2[i] = speed_rightward[i];
            for (int i = 0; i < 4; i++)
                motors[i]->setVelocity(speed1[i] + speed2[i]);
            continue;
        }

        double gray[width];
        int left, right;
        int left_flag = 0, right_flag = 0;
        for (int i = 0; i < width; i++) {
            gray[i] += camera->imageGetGray(camera->getImage(), width, i, height * 1 / 3);
            if (!left_flag && gray[i] < 100) {
                left_flag = 1;
                left = i;
            }
            if (left_flag && !right_flag && gray[i] > 100) {
                right_flag = 1;
                right = i;
            }
        }

        if (!left_flag) {
            cout << "Out" << endl ;
            continue ;
        }
        if (!right_flag) right = width - 1;

        int mid = (left + right) / 2;
        double err = (mid - center_width) / velocity;
        for (int i = 0; i < 4; i++)
            speed1[i] = speed_forward[i];
        for (int i = 0; i < 4; i++)
            speed2[i] = err * speed_rightCircle[i];
        for (int i = 0; i < 4; i++)
            motors[i]->setVelocity(speed1[i] + speed2[i]);

        double gps_speed = gps->getSpeed();
        double times = c / gps_speed;
        if (gps_speed > max_gps_speed) max_gps_speed = gps_speed;
        double nx = gps->getValues()[0], ny = gps->getValues()[1];
        double error = fabs(sqrt(nx * nx + ny * ny) - r);
        if (error > max_error) max_error = error;\
        cout << "now : " << sqrt(nx * nx + ny * ny) << " r : " << r << endl;
        cout << "Time of a circle : " << times << " s per circle" << endl;
        cout << "Speed of GPS : " << gps_speed << " m/s; Max speed : " << max_gps_speed << " m/s" << endl;
        cout << "Error : " << error << " m;  Max Error : " << max_error << " m;" << endl;
    }

    return 0;
}
三 实验结果与分析
实验结果
小车能够正常地巡线行驶。
由于不能在pdf中放置gif或者视频,具体状况可运行仿真环境观察。
分析
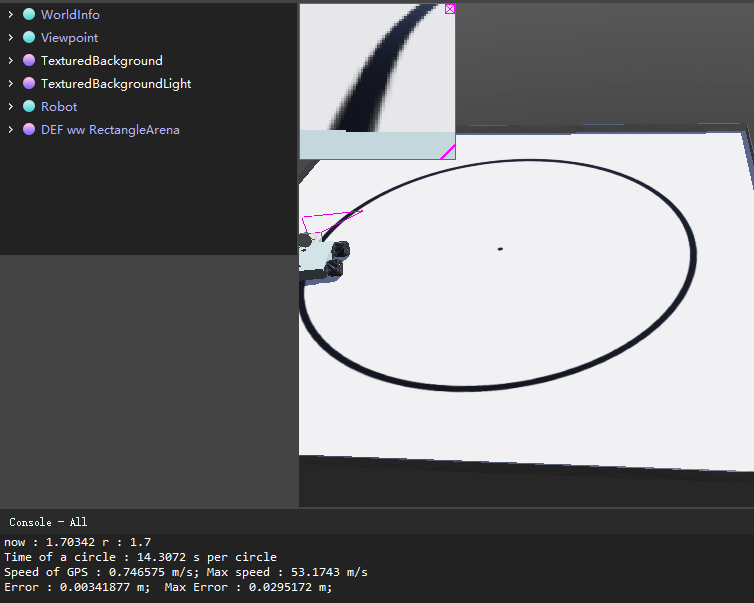
截取运行过程中某个时刻的信息(此时已经走了很多圈了):
now : 1.70328 r : 1.7
Time of a circle : 14.3134 s per circle
Speed of GPS : 0.746254 m/s; Max speed : 53.1736 m/s
Error : 0.00328397 m;  Max Error : 0.00497877 m;
解释一下以上指标:
- now:表示当前位置与圆心的距离,单位m
- r:表示圆的半径,单位m
- Time of a circle:走一圈的时间,单位s
- Speed of GPS:当前小车的速度,单位m/s
- Error:当前位置距离半径的偏差
- Max Error:最大偏差
可以发现,小车在正常的速度(指0.7m/s)下,依旧能够正常的巡线行驶,而绕圈圈的误差也控制在0.01m以内。
四 实验中的问题和解决方法
困难一
一开始设置偏移量和角度的时候,总是很难调整到想要的位置。后来我发现,原来鼠标点击箭头是可以通过鼠标调整的。
困难二
在最初小车运动的时候,小车一直在跳舞。经过一番探索,需要调整相机的位置和视角、算法中的横截线等参数,逐步尝试。
困难三
轨迹圆的半径只有1.25m,而且小车一直在圆上行驶,但是根据GPS的输出,小车行驶的误差达到了1.5m。仔细想想,1.5m已经大于了圆的半径了。检查了一下计算过程,并没有发现计算错误。那有一种情况非常有可能发生,就是坐标轴的问题。于是,显示了世界坐标轴,果不其然:
修改GPS获取的坐标信息后,依旧没有得到最正确的结果。再分析了一下原因,由于我设置了圆心在$(0,-0.5)$,而实际计算过程中,我计算到圆心的距离远大于半径,可实际上小车一直在圆上行驶。经过同学的指点,我在DEF ww RectangleArena/floorSize中,将地面大小改成了5x5,此时圆心就会落在$(0,0)$上。此时能得到正确的结果。目前还没有找到错误的原因,有一个合理的解释,就是我量半径量错了。
困难四
在完成仿真以后,想让小车的速度更快一点,于是我调大了电机的速度。但是仿真的时候发现,小车运行的速度和我设定电机的速度的差距有点大。后来阅读官方文档,才发现,单机速度的单位是rad/s的。